During the time between Christmas and New Year, which we tend to call the time “between the years” where I live in Germany, I wanted to do something fun, but not too fun so I don’t get spoiled. That’s how I turned up experimenting to use libMultiMarkdown from within a Swift app. The amount of fun I have when reading and writing C code is negligible, which made it a perfect fit.
“Month 13 is out of bounds” appeared in my Xcode console logs today. But I don’t do date arithmetics.
When you create an empty macOS Cocoa app from the template, the message shows, too. It’s emitted before applicationWillFinishLaunching(_:) is called.
Looking at the Console.app output of other processes, I saw this was all over the place. TextMate, loginwindow, User Event Agent – every app is triggering this message.
Let’s hope this does not indicate any important framework part is broken.
This is both humbling and worrying. Humbling, because Apple engineers make just the same silly mistakes as us app developers. Worrying, because having a working macOS is rather important to a lot of people around the globe, and while this message does not prevent me from using my Mac or any apps so far, bugs like these could have people killed in other contexts (think aerospace or autonomous cars).
Getting Worse
Update 2017-11-06: (Yes, I’m back on Nov. 6th! :) Seriously, it’s now Monday, Dec 4th.) Like some other people I was suddenly suffering from 100% CPU usage by the process UserEventAgent which also consumed RAM at a rate of about 4GB/ every 3 minutes. Disk swapping galore, my Mac turned unusable quickly. Only way I found to get rid of this:
Deactivate automatic date and time setting
Reset the date back to something in November
Force quit the UserEventAgent process
Note that this only happened after rebooting. So if you can, do not shut down your Mac for a while just to make sure.
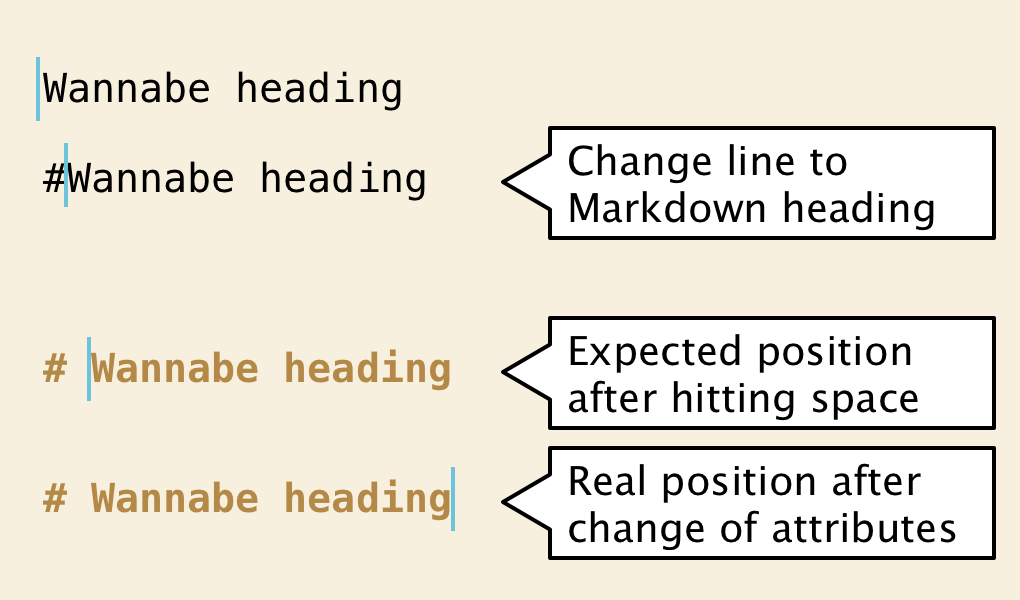
On iOS, this does maybe not happen at all, but when you want to write syntax highlighting code for macOS apps, copying together stuff from around the web, you’ll end up with broken application behavior. In short: when you type and the attributes of the line change, the insertion point is moved to the end of the line. That sucks.
I have migrated blog posts I published at cleancocoa.com over the past months back to this place. It was nice hosting the project on GitHub Pages, but in the end I never really wanted to post articles elsewhere. The original problem of my web imperium still persists: on this personal page, both my coding stuff and my software need a hub. A proper next step is to create a better website index to direct casual visitors, I guess, and improve the website navigation.
Dependency Injection means you do not create objects where you use them but “inject” objects a function/method/object depends on from outside. This is a useful trick to make code testable, for example. Once you adopt the mindset, it becomes second nature. From the Java world stems the imperative to program against interfaces, not implementations. In Swift, this means to define injected dependencies not as concrete types but as protocols.
Short answer: No. My trusty Mac mini served me well for years thanks to its 8 GBRAM and the 256 GBSSD. An SSD really helped make it faster back in the day. But with Xcode 9 and macOS10.13 “High Sierra”, the machine begins to stutter. I think it’s the CPU not really liking what I demand from it. Xcode 9 builds take a ton longer and the UI is less responsive. Sure, Xcode 9 sports a UI overhaul and might not be as performant as it could be, yet. That doesn’t help with the compile times which, for my current project, now take up to 5mins; that’s not even a fresh build.
Say you extract the ReSwift-based state module with all your app’s state types, reducers, and middleware into its own framework target. Until you add middlewares to the mix, it’s easy to keep this coherent. Injecting side-effects through middleware is not easy to do, though, as long as you provide the Store instance from your state module. The store takes an array of Middleware upon initialization. They cannot be changed later. The state module would then depend on your app module with all its network request services and whatnot. That’s the wrong way around, also resulting in a circular dependency. Instead, you have two options to add side-effects that are inherently part of your app’s module, not of the state module:
The following is a guest post by my pal Sascha Fast, with whom I also work on the Zettelkasten Method project. Because of recent events in the Apple app ecosystem, he figured it’s time for uncovering the truth behind popular arguments for subscription-based pricing. So, please warmly welcome Sascha! 👏
I have no clue why my previous attempts at customizing drawInsertionPoint(in:color:turnedOn:) always produced visual glitches. I really tried a lot of different ways. But it turns out you don’t have to do that much, really: Adapted to Swift from a Gist by koenbok.
I couldn’t find a simple answer on the web at first, so here’s my take for Googlers. When you need NSGlyph (which is a UInt32), you probably want to use NSATSTypesetter.insertGlyph(_:atGlyphIndex:characterIndex:) or NSGlyphStorage.insertGlyphs(_:length:forStartingGlyphAt:characterIndex:) which in turn is implemented by NSLayoutManager. But the useful glyph types to use like NSControlGlyph are Ints. How do you get a NSGlyph-pointer from these?
In the original post about a cheap way to set the line height in a text view to, say, 150%, the result kind of worked but didn’t look that cool. One issue is that the extra line spacing was exclusively added at the bottom. With the following solution, you’ll get a proper line height with tastefully aligned insertion point and baseline and all.
Typewriter modes depend on the feature that you can scroll farther up and down than usual. You need extra whitespace, most of the time in both directions. Let’s start with “overscrolling” to understand what we need. Regular text views show additional bottom whitespace only until you fill it with text. Take TextEdit, for example. You can start to type at the topmost edge of the text view and the rest of the window is blank.
I am currently working on a typewriter mode text view. Even though this is a very popular trend for a couple of years, I couldn’t find any open source component for this feature. I assume those who figure this out keep it a secret. If that is the case, it doesn’t make that much sense nowadays anymore since every 3rd note taking app or so has such a feature already.
Transitioning from Nibs to Storyboards poses a few challenges. One of them being creating outlets from a parent view controller to a child view controller. There is no such thing. You could say this is the new idiomatic way to create interfaces, but I don’t quite agree with the consequences. How do you pass data to a view controller 4 levels deep in the hierarchy? It’s not obvious. And there are no “embed” segues like you have them on iOSto obtain references.
After yesterday’s wrap up of my fix for vibrant table views, I have discovered that NSSplitViewItem has 3 initializer variants since macOS10.11: The latter will not add vibrancy. Guess who, by accident, discovered his table view to be wrapped in a init(sidebarWithViewController:) call.
I discovered my own idiocy and found that I overlooked which initializer of NSSplitViewItem was called. Apparently, the sidebar-related one adds vibrancy by default. Dealing with un-vibrancifying a table view might still be interesting, so I leave this up.
When you have a reference to your store of ReSwift.StoreType, you can use the current state property to get to a value directly. This means you don’t even need to make the object a store subscriber to grant access to some store state. I don’t recommend doing this in real code, of course. This is just like any global variable and comes with the usual problems.
For quite a while I didn’t notice Sequence.first(where:) exists. It’s like first, only with a condition. Proposed and implemented by Russ Bishop, by the way. I have now happily migrated from my self-baked findFirst to this method – only to find out today that there’s not last(where:) equivalent.
So here’s what I learned so far about the building blocks of reactive UI components from peeking at the RxCocoa source. UI components in general can have properties (read/write), input ports (read), and output ports (write). Classic UIKit/AppKit output ports would be delegate calls; classic input ports would be commands like display(banana:) that you probably write every day or so.
Another month goes by, another little macOS component was released.
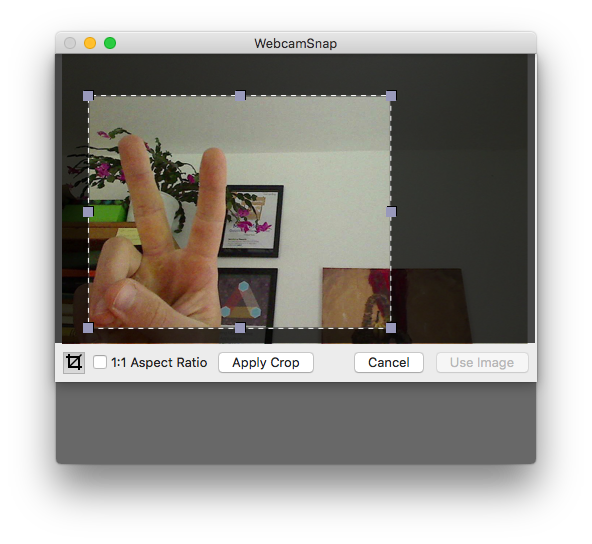
This time, I wanted to have a very simple drop-in view component that takes pictures with the iSight camera of MacBooks or any other connected USB camera device. And if the user wants to crop the picture, I wanted to add that as post-processing.
Thought this would be a common need, but Google wasn’t helping much. So I coded this thing myself.
Before I got it working, all the AVFoundation code looked pretty scary. But it’s simple, really, when you think about the possibilities of audio and video capturing and processing.
These are the requirements to take a photo with a USB camera using AVFoundation:
you need a AVCaptureSession that controls the lifetime of the audio and/or video input and/or output;
you specify output ports of type AVCaptureOutput, like the AVCaptureStillImageOutput I use here to grab a single image (instead of video or audio);
you specify input ports of type AVCaptureInput, like the AVCaptureDeviceInput that takes a AVCaptureDevice, which in this case is of type AVMediaTypeVideo;
you add a Core Animation layer (CALayer) to a preview view using AVCaptureVideoPreviewLayer(session:) so users see what the camera is showing before they hit the “Take Picture” button.
If things work out well, you have a session that can read video data from your camera device and streams the video signal to the preview. You can shoot photos, also known as “request still images” from the video stream, using captureStillImageAsynchronously on your AVCaptureStillImageOutput.
All of this setup is encapsulated in the Webcam object of my library. (links to the version of v1.0.0, no the latest, to prevent dead links in the future).
For example, I have a button, after user pressed it I want to start some process if I’m in state A. So, I have to write an action creator, which will check current state and then return correct action, or not action at all. Then dispatch this action from the same place.
Redux.js and ReSwift behave quite differently. Redux recommendations may not apply in all cases.
Clearing up Redux.js/ReSwift confusions
Action Creators in ReSwift
“Action creators” is a rather specialized term in Redux.js, but the type is defined like this in ReSwift as of v4:
So contrary to general advice, you do have access to the state at the point of dispatching the action. You don’t need a Thunk implementation, although Thunks or Epics can help in more complex cases.
“Action Creators help encapsulate action creation details”
A common benefit of Action Creators in Redux is their function as a factory.
Redux.js actions are object literals. Redux actions, if you were to write them in Swift, would be more like Dictionarys. If you come from an Objective-C background, you know both the good and bad of dictionaries: they are flexible, but you can cause trouble with typos, and the compiler won’t catch changes to values or keys if they are stringified. That’s how Action Creators in Redux.js provide the convenience of factories (as in “Factory”, the Gang of Four design pattern).
The ReSwift.Action type is usually implemented in custom value types (structs), though. ReSwift does not suffer from that problems of Redux.js actions. That means by creating a custom action type in ReSwift, the benefit of centralizing action creation in one function goes away. The initializer of your type does provide this already.
That paints a totally different picture.
And that’s probably why ReSwift.Store.ActionCreator passes in the state: to provide any benefit at all. At the cost of a different kind of API than Redux.
Application to the Question
Recall the question:
For example, I have a button, after user pressed it I want to start some process if I’m in state A. So, I have to write an action creator, which will check current state and then return correct action, or not action at all. Then dispatch this action from the same place.
There are a couple of ways to achieve that.
If you have access to the store variable to call dispatch, you also have access to its current state property. You can ask the store for the state the app is in and act accordingly. Usually, you’d write store subscribers to get “push notifications” of store changes, but in cases like this you can also ask the store.
That means the following would be a totally valid implementation:
Since ReSwift Stores are not supposed to receive dispatch commands from different threads, you can rely on the state from line 1 to be the same in the last line, where you dispatch.
TL;DR: you do not need ActionCreator to achieve this. But you can if you like to write “east-oriented” code, leaning on callbacks instead of property queries:
store.dispatch { state, _ in
    if state.someSubstate == "A" {
        return ActionWhenInStateA()
    } else {
        return ActionWhenNotInStateA()
    }
}
I am currently struggling to write my user interface layer (Mac) in a way that works well with RxSwift (the reactive library). Meanwhile, the whole app’s state is maintained by ReSwift (the unidirectional data flow library). Both work well together, but I made some weird choices initially. For example, I’d write Presenters to subscribe to store changes, assemble a static View Model, then pass that on to the View. That’s all nice and imperatively object-oriented.
TableFlip doesn’t sort tables by column as of yet. So we all have to resort to other solutions – like shell or Terminal commands. Let’s say your (Multi)Markdown table starts with a header (=2 rows) and has leading pipes like this: You can sort the table by the 3rd column (column “c”) like so: Explanation:
I totally forgot to bring this up: ReSwift version 4 was released 13 days ago!
The coolest part (in my opinion) is to skip duplicate states in subscriptions if you want to. The state has to be equatable somehow to do this with the default subscription measurements. But then again you’re using this anyway right now with ReSwift 3.x, only for every subscriber.
The skipRepeats in the subscription builder/configuration block will be used automatically if the selected state conforms to Equatable. But you can use your own skipRepeats implementation if needed.
In theory, you could add map and filter and whatnot to the underlying Subscription type that’s being configured in the block you pass to subscribe(), though I don’t see much value in this at the moment.
This is an old hat in Cocoa: when you change the appearance of NSTableRowViews, they will indeed look different – but the enclosing table view itself will still draw the system default background to fill the space below the last row. Similarly, when you have scrolling elasticity enabled and scroll above the topmost row, whatever is being drawn there won’t match your custom styled rows, either.
“Not So Super Mario” was brought to my awareness on Twitter today. This is a very geeky and fun take on accessibility, and it concerns our work of the digital world, too, as you know. Color contrast and larger fonts isn’t for the disabled, only. It benefits everyone. And your app design will be better.
Since I’m going to spread my writing thin on this blog in the upcoming weeks, I thought it might be nice if I highlighted some things that were happening. So here goes. Update 2017-04-29: Forgot the coding stuff. Is now added!
Today I wrote my first asynchronous test in my latest project and suddenly, during the waitForExpectations run loop, a totally unrelated test’s stuff crashed. To make things worse, it was part of an RxSwift subscription. No idea who kept that alive and where the EXC_BAD_ACCESS really originated.
I am using SwiftyBeaver in TableFlip and my latest project. Doing some robust console and file logging is important, and this library seems to work just fine for my needs. Except for error reporting. I do not want to attach the whole debug log when folks may report a simple problem. So I figured: maybe it’ll help to have the last 5 or 10 log messages attached upon a first error encounter.
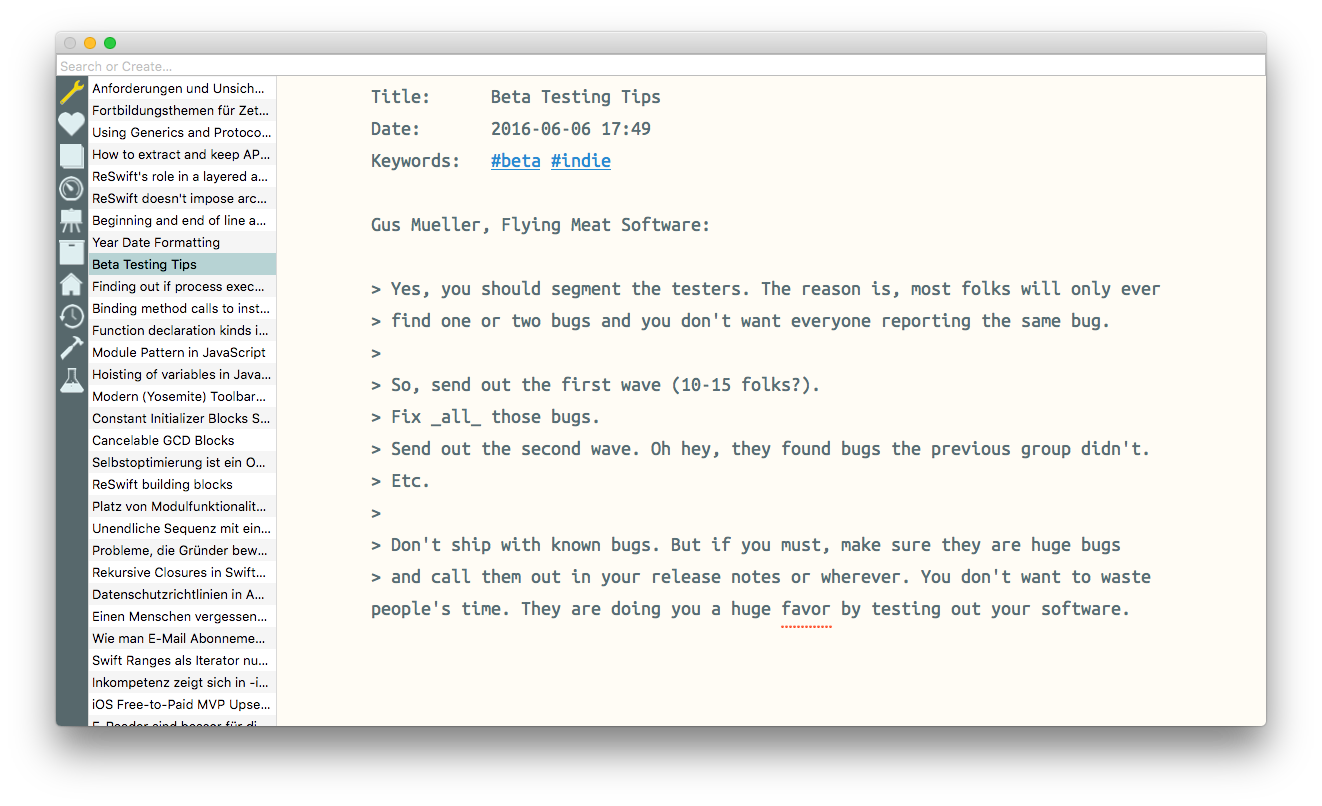
My latest project is about to be ready: it’s a strictly plain text note-taking application. If you know our writing over at the Zettelkasten Method blog, you will know the method I’m incorporating in this app. Everything revolves about flexibility and your ownership of the notes. Plus the amazingly productive method itself is baked right into the app to guide your workflow.
@objcprotocolRefreshable{/// The refresh controlvarrefreshControl:UIRefreshControl?{getset}/// The table viewvartableView:UITableView!{getset}/// the function to call when the user pulls down to refresh@objcfunchandleRefresh(_sender:Any);}extensionRefreshablewhereSelf:UIViewController{/// Install the refresh control on the table viewfuncinstallRefreshControl(){letrefreshControl=UIRefreshControl()refreshControl.tintColor=.primaryColorrefreshControl.addTarget(self,action:#selector(handleRefresh(_:)),for:.valueChanged)self.refreshControl=refreshControlif#available(iOS10.0,*){tableView.refreshControl=refreshControl}else{tableView.backgroundView=refreshControl}}}
I use protocols for interface abstractions in my model and service layer a lot; but in the UI, I often resort to delegation to classes. I almost never use protocols in the UI that come with default implementations. Now that I think about it, I believe most custom protocols that I do implement in the UI layer are of DisplaysBananas kind – implementations for the view protocol of a presenter.
Oliver’s gist made me think about other techniques to separate concerns in the UI. Not just delegation to sub-view controllers and encapsulation of view data in structs, but maybe a few more protocol abstractions here and there. When they make sense, that is.
Update 2017-11-26: This announcement appeared on the GitHub hosted page for a while and is now outdated; I leave this here for historical accuracy after merging the websites. The past couple of weeks have been unusually quiet around here. There are a couple of reasons: Then there’s a lot of preparation happening for side-projects and my stuff at the Zettelkasten Method blog where we will run a live video stream today, by the way.
Update 2017-11-26: This announcement appeared on the GitHub hosted page for a while and is now outdated; I leave this here for historical accuracy after merging the websites. I started and kind-of-finished this step after TableFlip’s release back in November 2016. But then I never pulled the trigger. So the redesign and usage of the cleancocoa.comURL didn’t really happen. Until today.
One important user interface part of my latest top-secret project involves a sidebar of buttons. Like a regular toolbar, but taking up less space for chrome, looking more flat, and the user should be able to create toolbar buttons herself.
So while I was mostly sick at home for the last couple weeks, I spent my time cobbling this together. With drag and drop reordering and all.
I have never written my own custom view component from scratch before. I helped improve KPCTabsControl for Swift 3 when I created TableFlip last year. And of course I participated in a lot of smaller open source projects, too. But I never started from scratch, and that was cool.
Also fun: creating the library’s own “logo”. Made it feel so much more official.
What’s cool about writing a new thing from nothingness is that I had no clue what to do and how to start. This component turned out as rather adventurous mental gymnastics because I had to leave the paths of application development I know so well. I still don’t know all the answers; what are best practices? Get something colorful on screen? Customize drawRect and draw boxes and placeholders? Partition the view into sub-components using Auto Layout from the get go? Is drawing text better handled by NSTextField labels than NSAttributedString.draw(in:) or is the overhead too much? (I still don’t know the best answer for this.)
Anyway! I ended up putting this together as a library with sample app. There are some unit tests for inserting items into the “fat sidebar”, but otherwise I find the drawing and layout related code to be absolutely hideous. Cannot come up with improvements on that front that go beyond cosmetics, though. Maybe later, with more experience.
The following code works as expected: But do you know what “expected” means in this case? As a reader, you assume the author had an intention. You look for the mens auctoris and are an overall benevolent reader, I hope. Presupposing said intention, you may assume that it does something special if you put the call to items.removeAll() in a defer block.
NSTextView (and UITextView for that matter) have a defaultParagraphStyle attribute where you can set the text’s line height. That works swell – if you display text statically. Once the user can enter something, you can run into trouble: Update 2017-07:I posted a better version without paragraph style attributes that hooks into the NSLayoutManager delegate callbacks for a more consistent and speedy experience!
I wrote about using NSUndoManager + ReSwift with a Middleware. You could think of the resulting UndoMiddleware as some kind of observer of events that pass the ReSwift.Store and which puts the opposites of incoming actions on the undo stack. Why a Middleware? Because making an action undoable is a side effect.
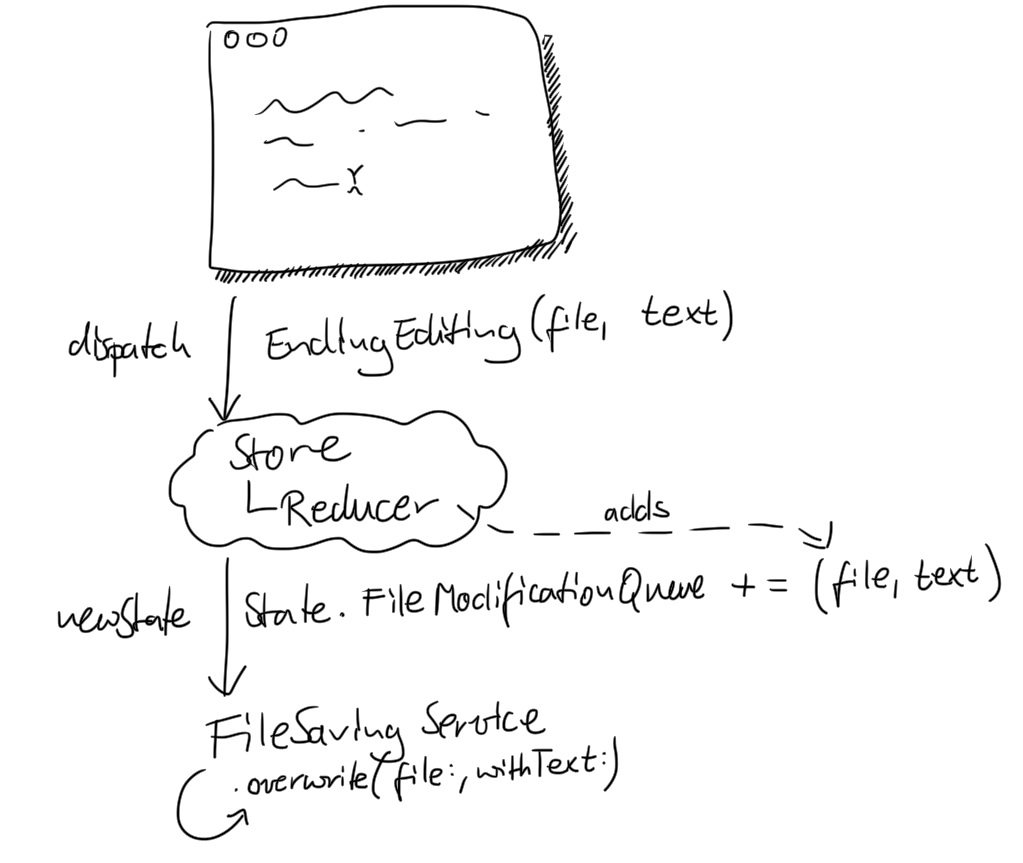
Automatic saving of changes in some user interface component to a file should be handled differently when you employ ReSwift. In short, you have to extract the state information from the “save file” action and store it in the overall app’s state somehow. I append these to a collection of PendingFileChanges, a ReSwift.StateType that is part of my overall app state.
Sadly, the recording doesn’t contain the webcam stream. When I don’t see the face of the speaker, especially if he or she isn’t native English, then it can be quite a pain to follow at times. Sadly, this recording does not include my webcam stream, so finger’s crossed you understand what I say here!
I promised not to distribute any follow-up material until next week so that webinar attendees have early access.
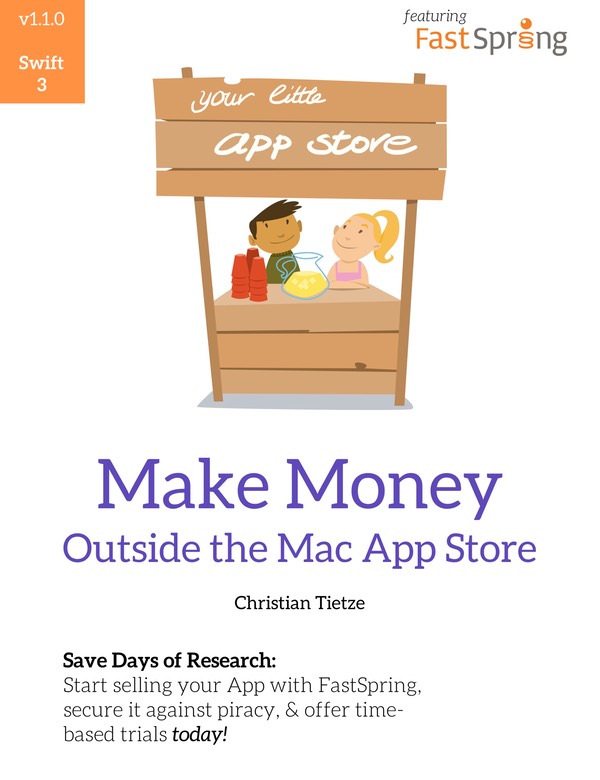
Ladies and gentlemen, I have finished updating my e-book about ditching the app store and selling your apps with the help of FastSpring for Swift 3! I also got annoyed by “$x.99” prices and lowered the price from $24.99 to $22. The Indie Mac Developer Book Bundle is now just $27, too.
Ditching the Mac App Store – Why, and what it means.
Is There Life After the Mac App Store? – Choosing an e-commerce provider.
Getting Back to Development – How you change your code to work outside the Mac App Store.
Plus you’ll see me live. That alone should be motivation for you to visit, no matter the topic :)
Disclaimer, aka Code of Honesty and Transparency
Maybe you just arrived on my blog and don’t know how I do things around here, yet, and how much I value morality over profit anytime. So let me erase your doubts about this webinar cooperation.
I use FastSpring to sell my stuff. I really like their service, so I wrote a guide in 2015. FastSpring in turn was impressed by my initiative and helped me spread the word a bit and provide background info whenever I needed anything. I am not getting paid by FastSpring for the book. It’s my own creative work. I maintain it because I think it helps you, fellow developer, to set up your own indie business.
Then late 2016, FastSpring approached me as their go-to expert for Mac app development. They plan to show how easy it is to use FastSpring to distribute Mac apps. In other words, they want to own part of the good news for obvious marketing reasons.
With the recent Out-of-App-Store Success Stories by Rogue Amoeba and Kapeli, it may even be a growing market.
I was skeptical at first. I will not violate my strong ethics; teaching people the One True Way™ is more important than easy money. But I came to find FastSpring values delivering useful content over running a 60-minute ad show. From the get go, FastSpring wanted me to create the content. Not even once did they suggest I add something to my slides. They totally risk I go live on Wednesday and tell people to use a competing service. But I won’t, because I know no better service provider. I liked the concept, so I agreed. I am getting paid by FastSpring for this webinar gig. But it’s 100% my webinar.
To stay true to myself, I will give genuinely helpful advice to empower the attendees to become independent. Of course I’ll show FastSpring’s features, just like the screenshots I put in my book. All because I believe in their service, not because they bought my loyalty with the speaker fee.
In short, this is not an advertisement for FastSpring. I haven’t sold my soul. It’s a cooperation out of mutual respect.
If you want to encapsulate the notion of “either A or B” (also called “lifting” in functional parlance), an enum type in Swift is the best fit: You can use associated values to wrap types with enums, too: These things seem to be expressible through a common ancestor type or protocol. But bananas and apples can be modeled in totally different manners (apart from sharing nutritional value, for example).
Say you are like me and work with ReSwift for unidirectional data flow goodness and employ RxSwift for your reactive cravings. You want to dispatch a ReSwift.Action when an RxSwift.Observable signal produces a new value. How do you write tests for that wiring? In code, it could look like this:
Found this nice post about using Swift protocols to expose read-only properties of Core Data managed objects so you don’t couple your whole app to Core Data. Using Swift protocols in Core Data NSManagedObjects is a great way to limit the visibility of properties and methods. In my 1st book on Mac app development I talked about this, too, and this is a lot easier to handle than a custom layer of structs that you have to map to NSManagedObject and back again. Core Data is designed to be invasive and convenient. It’s not designed to be used as a simple object-relational mapper.
There’s a lot to learn in terms of company culture from Basecamp (former 37signals). Shawn Blanc has written about a workshop by Basecame. One thing I just had to share immediately is this: “Bugs are the edges of what works”:
Software simply has bugs. And so if it’s not a critical bug — (such as: if it’s not losing customer data) — then they probably won’t ever fix it. Because to fix an edge bug and chase them all down means they’re not making new things or improving features that really matter.
That’s no excuse for a crappy user experience. But not every edge case has to be solved.
I found the Foundation way to check for file existence very roundabout. It returns 1 boolean to indicate existence and you can have another boolean indicate if the item is a directory – passed by reference, like you used to in Objective-C land. That’s a silent cry for an enum. So I created a simple wrapper that tells me what to expect at a given URL:
Shopify published amazing/epic stats for their Ruby on Rails “app”:
860k LoC
1:1.3 code–test ratio
2300 model classes
most classes <10 methods
most methods way <10 lines
Makes you wonder:
can you live with more types?
can you shrink down existing types?
Swift changed the game a bit. Now it’s very convenient to create a new type. You don’t need to do the .h/.m file dance anymore but can start a new type declaration wherever you are. (Except when you’re inside a generic type.) That makes it more likely we devs stop to shy away from smaller types.
But it’s still a job for our community’s culture to unlearn coding huge classes (massive view controller syndrome, anyone?) and splitting stuff.
Ruby has a long tradition of super-focused methods and very small classes. Swift is just as terse and powerful in that regard. Now it’s your turn to experiment with writing types for very simple tasks. Like the Extract Parameter Object refactoring, where you lift things that go together into a new type.
Can be as easy as writing:
structDateRange{letstart:Dateletend:Date}
Et voilà, there you have a new explicit concept in your code base.
Let’s say you have a Presenter that creates a ViewModel for its View from incoming data and then presents it in said view. In this case, the Presenter also is a ReSwift.StoreSubscriber for good measure, but it could receive the data by any means, really.
frameworkoriented.io hosts a text on “Framework Oriented Programming” (FOP). That title already looks similar to “Object-Oriented Programming”. But it’s not a replacement, mind you; it surely means the same for our cause as Cocoa UIKit/AppKit developers. The shift in perspective from object to framework works very well to illustrate the problem of designing large code bases.
I use a logging middleware in all my apps that use ReSwift. I love to see the event log. It makes me think the app is healthy when it tells me what’s going on. All this happens when I start the knowledge management app I’m working on in about half a second (reformatted a bit to make reading easier):
Let’s say you write a plain text editor that can work with multiple text files at a time. As a backbone for processing information, you use ReSwift to model the data flow in a clean fashion. The user has 10 files open, changes the text in 1 file’s tab. The user leaves the text field and your awesome autosaving is triggered.
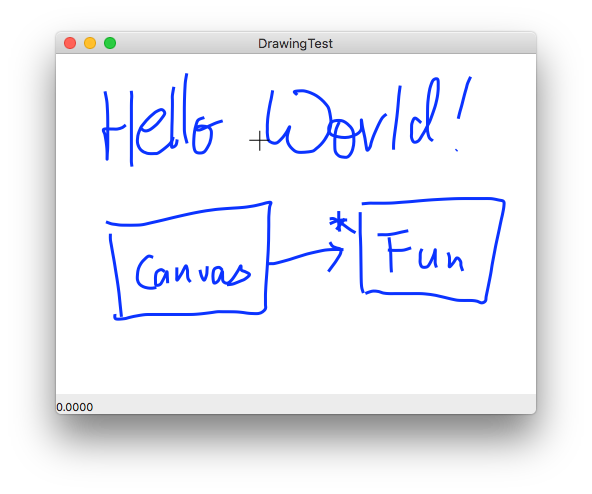
I have no clue how you create drawing apps. I guess your primary concern is low latency and good-looking results rather than making the most of cool new architecture patterns like VIPER. It’s a real-time thing. Not unlike games, I imagine. Still, “in between years” (between Christmas and New Year; but I like the literal German translation), I took a day or two to come up with a conceptual implementation (MIT licensed).
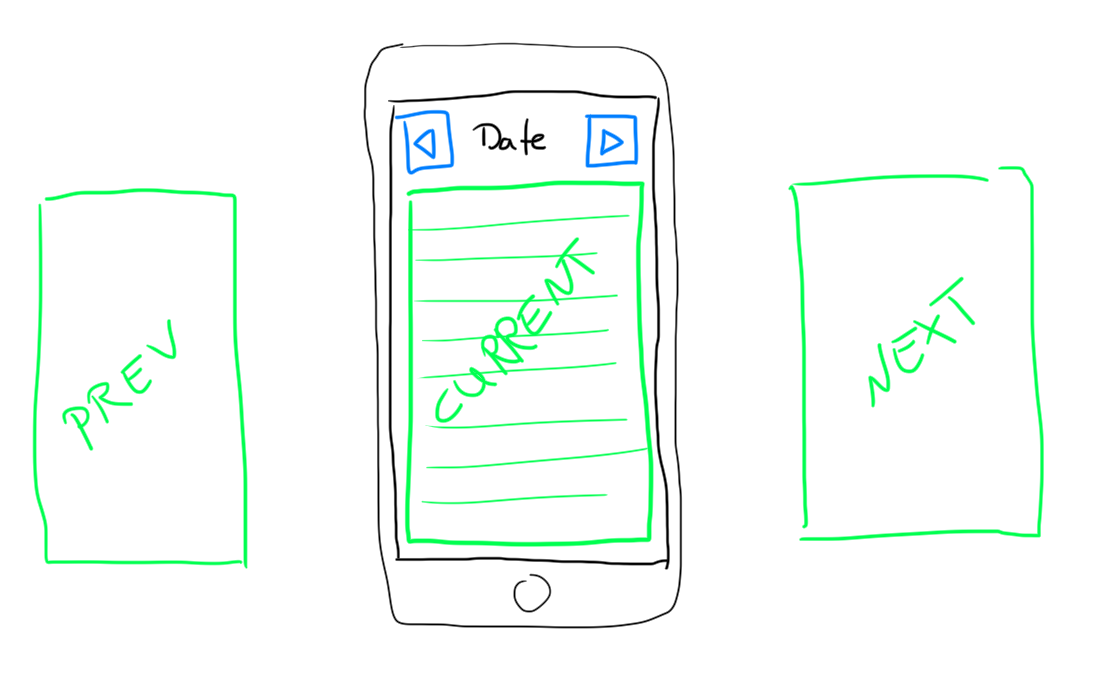
In a client meeting yesterday we tried to figure out how to animate scene transitions with swiping left/right when ReSwift is the single source of truth of the app state. What goes into the app state? How do you animate that? Should the % of the transition be part of the app state for some reason? (Spoiler: Nope.)